Thursday Tip: Adding a Project
October 2nd, 2014
Today’s tip is going to go over adding a project to your Ravelry notebook. This is the second of four posts in an Intro to Project Pages series; you can also check out the first post in the series if you’d like to see a Project Page Overview.
Let’s get started with adding a project!
Start a project!
You can start adding a project to your Notebook in several ways:
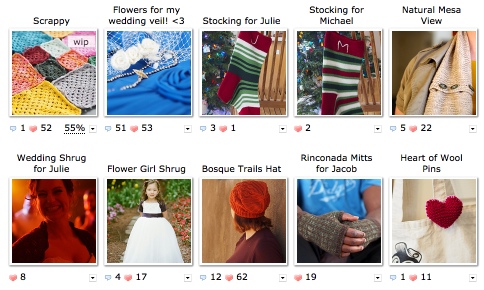
1) go to your Notebook section (you can get there by clicking the “my notebook” tab at the top of the page) and click on the “add project” button:

2) from the pattern page, click the cast on or hook it options you’ll see in the upper right:

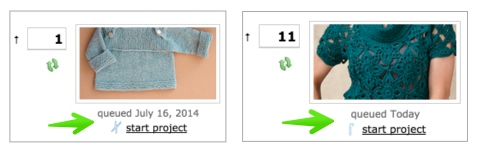
3) if you’ve queued the project, you can go to your queue and click the start project link under the pattern thumbnail:
Fill in the basic information!
Then you can enter the basic details about your project. If you started this project from your queue or the pattern page, you’ll need to click on the yellow pencil to edit these details, and some things (like the pattern name and source, and even yarn and notes if you filled that in on your queued item) will be completed for you already! If you are starting a project from the “add projects” button in your Notebook, you’ll see the following screen.

- Name your project: the project name can be whatever you like! Use the pattern name, or call it something else silly or sweet. This is the name that will show above your project on your main project page (like in the very first screenshot above).
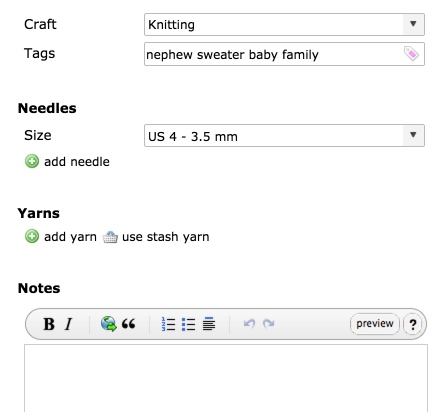
- Which craft? this dropdown will let you select the craft you used. On Ravelry you can add knitting, crochet, loom knitting, machine knitting, weaving, and spinning projects.
- Where can people find the pattern that you used for this project? Here, you can select your pattern source from the following options – this will help us search the database for you so that your project can be properly linked to the pattern, if you used one:
* Book or magazine
* Website or download
* Handout, pamphlet or sheet
* Based on a stitch from a dictionary, etc
* Not available – this is a heavily modified version of a design
* Not available – I improvised this design - Name of pattern: if your pattern was published and has a name, enter it here. (You’ll only see this field if you selected one of the first three options for pattern sources above.)
- Pattern source: If you selected “book or magazine,” “website or download,” or “handout, pamphlet or sheet,” you can enter the name of the source here.
After filling that out, you’ll get the chance to confirm the pattern on the next screen (again, if you start a pattern from your queue or the pattern page you can skip this step):

Add details!
Now you can fill in more detailed information about your project! Here is what you’ll see along the middle of your project page – here are the items we haven’t gone over already:

- Made for: was this a gift? Did you make it for yourself? Enter that here!
- Link to Raveler: fill in a Ravelry username in the “link to Raveler” field if you made it for someone on Ravelry! We even have a Thursday Tips post specifically about that feature.
- Size made: here you can enter the size or measurements of your project. Filling in the size you make can be really helpful for Ravelers browsing projects made from a specific pattern. For me this info is also useful for projects like hat and sock gifts where I’m not using a pattern – I just put in the circumference or head/foot measurement and I have that info handy if I make a gift for the same person in the future!
- Additional patterns: this allows you to link to additional patterns if you’ve used some of their elements in your project. We have a previous Thursday Tips post all about this feature, too!
Next up we have:
- Tags: use tags to help you label, filter, and organize your projects.
- Needles or Hook: here you can select the needle or hook size you’re using. As you may have figured from my Project Page Overview post, I definitely recommend filling in at least this info on your project pages! (Unless you are more organized and finish projects faster than I do… which is pretty likely.)
- Yarns: You can select the yarn you are using either from the Ravelry database (by clicking the add yarns link) or right from your Ravelry stash (with the use stash yarns link). These options are both pictured below – add yarns on the left, and use stash yarns on the right.

Start/Complete Dates, Happiness, Sharing

On the top right of your project page, you can note when you started the project with the start date, how far along you are with the progress bars, and how happy you are with your project with the little happy faces. Just underneath these options you can choose to share your projects with any of your Ravelry groups!
Next Steps (Coming Soon): Photos and Notes
Once you’ve filled in the basic info, you may want to add photos to your project page and start keeping notes in the notes field. I’m going to cover adding photos in my next Intro to Projects post, and then finish up the series with some ideas for keeping notes on your projects that are helpful to you and to other Ravelers.
Keep in mind that all of this information is completely optional – you are the boss of your project pages and whatever record you want to keep is A-OK! We hope that recording and sharing your project is useful for you, and that your project notebook is a fun place for you to look back and remember the wonderful things you have made.


